August 24, 2010

Plum Crazy: Rich and Delicious Plum Jam

My mother was the queen of preserving. It followed along with her inbred philosophy of using everything and wasting nothing, born from a childhood of barely modest means and hard work. We rarely bought canned anything: tomato sauce came from a Mason jar in the basement, pickles were at the ready, plum jam a year-round staple.

That plum jam seems to play in my memory the most. Rich, gooey and delicious, we used it for everything from thick buttered pieces of Italian bread to stuffing for dessert gnocchi. After a recent attempt at making pierogis, I was inspired to finally try my own version of plum jam, taking advantage of in-season Italian plums. The results were exactly right: as sticky sweet and satisfying as I remember.

Italian Plum Jam
yields 5-6 cups

Without a recipe to follow, I did a quick search online and found that most plum jams are nothing more than plums, sugar and pectin. While I had the jars, the plums and the sugar, I hadn't thought about buying pectin, so this version doesn't use any. This recipe from Taste Hungary provided the inspiration.

Approx 4 lb Italian plums*
8 oz sugar (by weight)
Juice of one lemon
1 cup water (optional)

* For the amount of effort it takes to make the jam, the next time around I'll be using lots more plums and adjusting the sugar accordingly. Stay tuned for details!

Equipment you'll need:

Large heavy non-reactive stockpot
Canning pot or oversized stockpot
Mason jars (4 oz or 8 oz size)
New lids and screwtops
Canning tongs
Canning funnel
Tools of the trade

1. Wash, half and pit the plums. Place in a large, heavy non-reactive stockpot (my Le Creuset was perfect), add the sugar, water if using and the lemon juice. Cook over medium heat, stirring constantly to avoid sticking.


2. While the plums are cooking, prepare the Mason jars. Wash the jars and lids in warm soapy water and rinse thoroughly. In a large canning pot (or regular oversized stockpot), place the clean jars, submerge in water and bring to a simmering boil until ready to use.


3. The jam is ready when the plums are completely soft and the liquid has become very thick and syrupy. It took about 3 hours for my 4 lb of plums; probably less time would be required if I hadn't added the water.


Almost ready!

4. To test if the jam is ready to can, place a small saucer in the freezer. When the jam seems to be the right consistency, place a spoonful on the plate and put back in the freezer for one minute. Run your finger through the jam on the plate: if the jam runs together, it's not ready; if the funnel you've created with your finger remains separate, the jam is ready to can.


Yum...

5. To can, first prepare the jars. Using the tongs, carefully lift and empty each jar of water, pouring the water back in the stockpot (keep the water simmering, replenishing if needed to ensure that the jars will be completely covered by one inch when placed back in the pot). Place on a clean tea towel.


6. When all of the jars are ready, you're ready to can! Place the funnel in a jar and carefully ladle the hot jam in, being careful to leave a ½" at the top. Wipe any excess jam off the top of the jar, place a lid on the jar, and put a metal band (threaded lid) on, turning so that the band is on securely but not too snugly.


7. Using the tongs, carefully place the filled jars back in the water, and bring to a boil. Be sure that the water is a generous 1 inch above the jars. Boil gently for 10 minutes, remove the jars with the tongs and place on the tea towel. Let the jam cool for 12 hours before storing. Your jam jars will "pop" as they are cooling: this is a good thing! It means the jar is properly sealed. Once the jars are cooled, you can test the seals in the following ways (source: pickyourown.org - see link below):

"Option 1: Press the middle of the lid with a finger or thumb. If the lid springs up when you release your finger, the lid is unsealed.

Option 2: Tap the lid with the bottom of a teaspoon. A clear ringing sound means a good seal. If it makes a dull sound, the lid is not sealed. If food is in contact with the underside of the lid, it will also cause a dull sound (that is not a problem or a sign of spoilage). If the jar is sealed correctly, it will make a ringing, high-pitched sound.

Option 3: Hold the jar at eye level and look across the lid. The lid should be concave (curved down slightly in the center). If center of the lid is either flat or bulging, it may not be sealed."
For more great tips and a detailed FAQ on home canning, see the Pick Your Own web site.


Happy canning!

August 17, 2010

Daring Cooks Challenge: Summertime Pierogi

I often wonder about where the love of cooking comes from. Certainly it’s as much about nurture as it is a learned art. Take my friend Vera, for instance. Dinner at her house is never a production, but relaxed and easy. Everything is always delicious and there’s always lots of food, a nod to her Ukrainian heritage and her generous hospitality. We go over hungry and never leave disappointed. Not surprisingly, her mother was also a wonderful cook. And although not every person who’s lucky enough to grow up with an artist in the kitchen translates that ability themselves, with Vera it’s bred in the bone.

Although it was long ago, I can taste her mother’s cooking still – always something ready to serve and abundantly. It’s probably the first time I tasted pierogis – that Eastern European version of the ravioli I was more accustomed to eating. And they were amazing. So I was really excited to read about this month’s Daring Cooks’ Challenge: Pierogis.  The August 2010 Daring Cooks’ Challenge was hosted by LizG of Bits n’ Bites and Anula of Anula’s Kitchen. They chose to challenge Daring Cooks to make pierogi from scratch and an optional challenge to provide one filling that best represents their locale.

Not only was making the pierogis going to be an adventure, but I was also looking forward to creating a stuffing that was uniquely local. I knew I wanted potatoes to be a key ingredient, and Vicki’s Veggies had beautiful new agria potatoes, plus there were shallots that were just the right size.  A bit of kale from Everdale Farm would add healthy colour, Pingue Niagara smoked pancetta would soften the kale’s bitter edge, and I would finish the mixture with Blossom, a creamy sheep’s milk cheese with flecks of lemon zest from Monforte Dairy.

Agria potatoes - top left corner, just below the sign

Everdale's kale is pretty enough to put in a vase and enjoy before eating

Can you see the flecks of lemon zest?

With the ingredients fresh from the market, the pierogi-making adventure began.

Russian style pierogi
makes 4 generous servings, around 30 dumplings

This traditional Polish recipe is Anula's family recipe. The filling is my own.

For dough:
2 to 2½ c all-purpose flour
1 large egg
1 tsp salt
About ½ c lukewarm water, more if needed

For filling:
1 lb fleshy potatoes
1 medium bunch kale, washed, tough stems trimmed, chopped roughly
1tbsp olive oil
1 small shallot, minced
1-2 oz smoked pancetta (or a good quality prosciutto), finely diced
1/3 c creamy goat or sheep’s milk cheese
Salt to taste*

*You’ll want to add salt as a last step, since the cheese and pancetta will add saltiness to the filling.

Make the dough:
1. Place 2 cups flour in a large bowl or on a work surface and make a well in the center. Break the egg into it, add the salt and the water. Bring the dough together, kneading well and adding more flour or water as necessary. Cover the dough with a bowl or towel. Let it rest 20 minutes.*


*My mother always let her pasta dough rest for at least an hour before rolling it out and with that in mind, I wrapped the dough in plastic, and let it rest in the fridge for a couple of hours.

Meanwhile, make the filling:
1. Peel the potatoes, quarter them, and boil until soft enough to mash. Don’t salt the water! (see note above)

2. While the potatoes are boiling, prepare the kale. In a large skillet, heat the oil over medium heat, and add the shallot and pancetta, stirring for a minute. Add the kale and continue to cook until the kale is wilted and cooked, but not completely wilted. Take off the heat and let cool.

3. Mash the potatoes until they are smooth and creamy. Transfer the potatoes to a bowl and add the cheese, mashing to incorporate thoroughly.


4. Chop the kale mixture as finely as possible. Add the kale to the potato mixture and stir to combine. Test for salt and add more if needed.


Make the pierogis:
1. On a floured work surface, roll the dough out thinly (⅛”) cut with a 4-inch round or glass. Spoon a heaping teaspoon of the filling into the middle of each circle. Fold dough in half and pinch edges together. Gather scraps, re-roll and fill. Repeat with remaining dough.


This is going to be a case of delayed gratification. I wanted to share this first attempt with Vera, and with travel, cottages, kids and life, getting together will likely be a bit of schedule shuffle. The pierogis wait, frozen and ready to pop into boiling water at a moment’s notice. Vera, when are you coming over?

August 13, 2010

It's Easy Being Green: Edamame-Bean Summer Salad

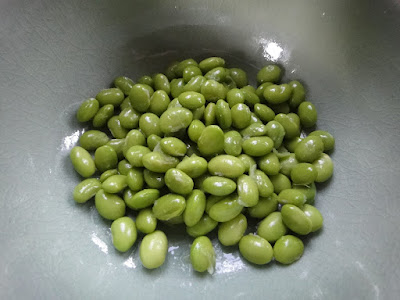
I admit it - I'm a bit obsessed right now with sunflower sprouts.  I mean, they're just so good!  Rather than just eat them out of the bag by the handful, I decided to put all of my green market buys into one fab dish.  This salad is so yummy that I wanted to eat the whole bowl but restrained myself to stretch out the joy for a least one more day.  And incidentally I discovered my new obsession - fresh edamame beans.

Edamame and Green Bean Salad
serves four

I know, I know....things like fresh edamame beans and sunflower sprouts are not your standard supermarket fare.  I've suggested some substitutions you might try.  Whatever you use, make sure it's fresh - and preferably local.  This is not about food snobbism but the pure pleasure of eating really really fresh things that just came out of the earth.  I promise that you will feel like you've been given a giant vitamin.


1 pint fresh edamame beans (approx one c shelled; use frozen edamame if fresh are not available)
2 c mixed beans (green, yellow, purple - so pretty! or just good ole green beans will do too), trimmed and cut in half
1 tbsp plus ¼ c olive oil (make sure the ¼ c is your very best stuff)
1 lg shallot, minced
1 garlic clove, minced
2 anchovies, either packed in salt and rinsed, or oil-packed, cut into thirds
¼ c chicken stock or water
2 c fresh sunflower sprouts (use lettuce if sunflower sprouts are not available)
1 tbsp Dijon mustard
Splash Champagne vinegar (use white wine vinegar as a sub)
½ tsp French grey sea salt (or any fine grained salt)
Pinch sugar
Freshly ground black pepper to taste.

1.  Rinse edamame thoroughly to remove any sand.  Bring a pot of water to a boil and add the beans.  Boil for approximately 7-8 minutes, or until the beans are cooked but still with a firm bite.  Drain the beans, rinse with cold water and set aside.


2.  Meanwhile, heat 1 tbsp olive oil in a large skillet over medium heat.  Add shallot and garlic and saute for a minute until fragrant.  Add the beans and anchovies and continue cooking, stirring constantly.  After a few minutes, add the stock or water and cook until the beans are tender-crisp, about 7-10 minutes. Take off heat and set aside.

3.  In a small bowl, combine the ¼ c olive oil, mustard, vinegar, salt, sugar and pepper and whisk until thoroughly blended.


4.  Put the sunflower sprouts in an attractive serving dish.  Top with the green beans, and then the edamame.  Pour dressing over the salad, toss gently and serve.


I got the fresh edamame beans from O.K. Farms, which has a stand every week at the Liberty Village "My Market". It's the first year they've grown the soybeans and they're absolutely fantastic.

August 11, 2010

Mellow Yellow: Fabulous Yellow Pepper Sauce


There is a recipe here, I swear.  But first I want to talk about olive oil.

How many different kinds of olive oil have you tasted in your lifetime? Maybe you always stick to the tried and true, Colavita, say, or simply something that’s handy and relatively inexpensive in your part of the world. Maybe you have a favourite Italian spot that cheerfully and generously puts miniature carafes of olive oil on the table, the better to soak your bread in. You might even splurge regularly for a bottle of rich oil from a far flung place: Italy, Spain, Greece.

Sadly many imported olive oils are simply bottled off shore. The olives themselves might be a mongrel mix of dubious pedigree, and the oil may not even be extra virgin, even though the label says so.

So, when your feet are on the soil that yields the olives; when you shake hands with the producer who protectively watches every tree; when you taste that oil, with a terroir to rival any fine wine; and when that oil explodes on your tongue in a burst of fruity spicy goodness – oh my. You are done with that other stuff.

The beautiful grounds of Fattoria Montalbano

This is the olive oil of Fattoria Montalbano in Regello, just 27 kilometres south of Florence. Luciano and Daniela Nustrini run Montalbano, a wonderful agriturismo set on 25 acres in lush and lovely Tuscany. In addition to the beautifully rustic villas that house guests, the fattoria (farm) produces what I think just might be the best olive oil ever. The four family whippets rule the roost, while the lone shaggy dog Iago eyes them laconically. There are an equal number of cats, including this tortoise beauty we adopted for three days. Plus chickens, goats, a sad looking donkey, and incidentally four children.

All that and yet Montalbano is blessedly secluded and deeply restful. The guest villas are set some distance from the house, ensuring privacy and the ultimate chance to relax. Breakfast is low key and casual, and the small villages of San Donato in Fronzano and Donnini have well equipped greengrocers so that you can make your own meals, and only slightly further afield there are plenty of options for small and delicious trattorie and osterie.

Lunch al fresco on our private terrace

Our room with a view...

Lavender and rosemary as far as the eye can see

 But by far our favourite meal in our three nights stay was at Montalbano itself. Daniela, who never seems to sleep, will occasionally make dinner for guests. The multicourse meal is served in the taverna, a 300 year old cantina originally used to store olive oil. Lit with hundreds of candles, served alongside the farm’s own delicious Chianti, the meal was sumptuous and completely satisfying.

Salsa di Peperoni Gialli (Yellow Pepper Sauce)
makes approx four cups

This fabulous yellow pepper sauce was actually served atop grilled bread as part of the antipasti course at Montalbano. In the middle of serving several tables, Daniela generously jotted down the recipe for me.  Not only wrote it out, but tied it with a beautiful fragrant flower from the garden.  A truly memorable night.

As I contemplated how I would cook my fresh halibut for dinner tonight, it struck me that this sauce would be an unusual – and unusually good – accompaniment. I lightened the sauce by using yogurt intead of whipped cream.

3 large yellow peppers
1 tbsp good quality olive oil
1 garlic clove, chopped
Scant c water
½ c plain low fat yogurt (I used goat yogurt in a nod to Montalbano’s herd)*
½ tsp kosher salt, or more to taste
Coarse black pepper to taste

1. Wash the peppers and slice them into thin slices.

2. In a large skillet, combine the oil, garlic and peppers over medium high heat. Add the water and cook, stirring constantly, until the water is almost evaporated.


3. At this point, the peppers will begin to brown. Continue cooking, a couple of minutes more, until they are evenly and very lightly browned. Remove from heat.


4. Transfer the peppers to a blender and blend to a smooth puree. Place in a bowl, add the yogurt and stir thoroughly. Add the salt and pepper, and adjust for seasoning.


The sauce can be used as it is at Montalbano, as a spread on grilled bread, or a dip for crackers. Thinned with a little vegetable or chicken broth, it would be a wonderfully different type of cold summer soup.  And, as I thought, it really was unusually good on a piece of simply roasted halibut, served alongside a salad of mixed sunflower sprouts and pea shoots that were topped with sprouted radish and lightly dressed with Fattoria Montalbano's finest. 


The greens are from Kind Organics, a local farm that's been operating since 1999.  Sandra and Tamas Dombi, along with partner Amber Malek, grow the most incredibly fresh greens: they taste alive when you eat them, and are best served just as I did, with a bit of crunchy salt and that amazing oil.  And if you haven't had fresh sunflower sprouts, make a vow to find them before summer's over.